Eye Caramba for V4 and M4
 stringtheory9
Posts: 411
stringtheory9
Posts: 411
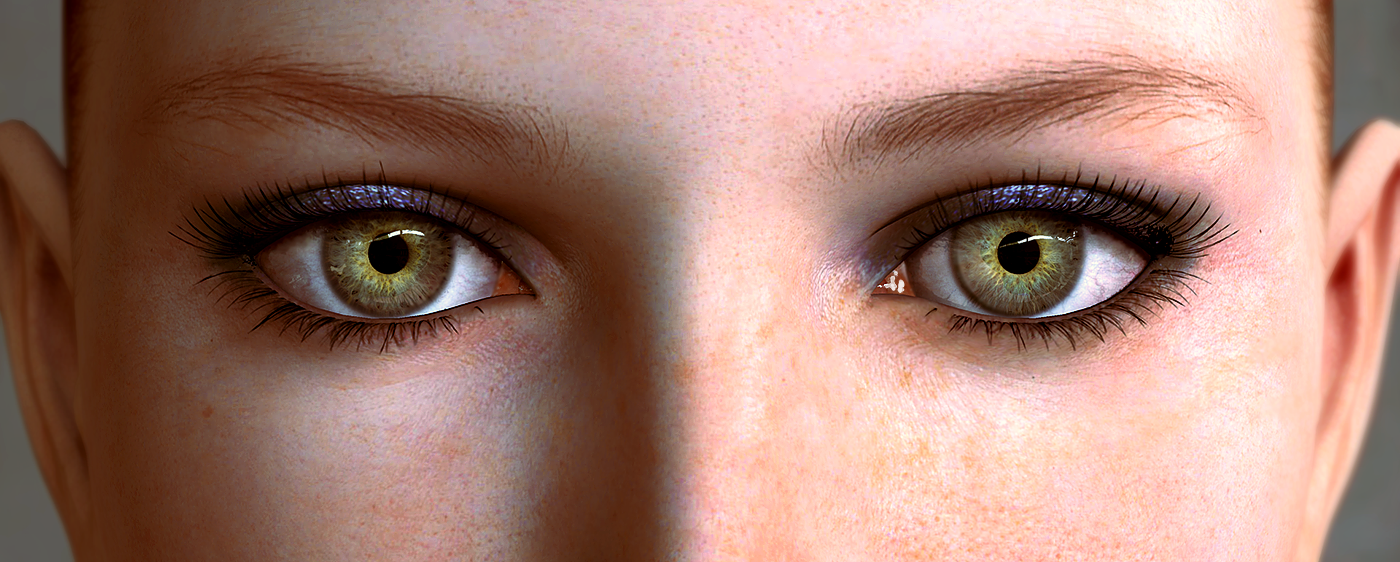
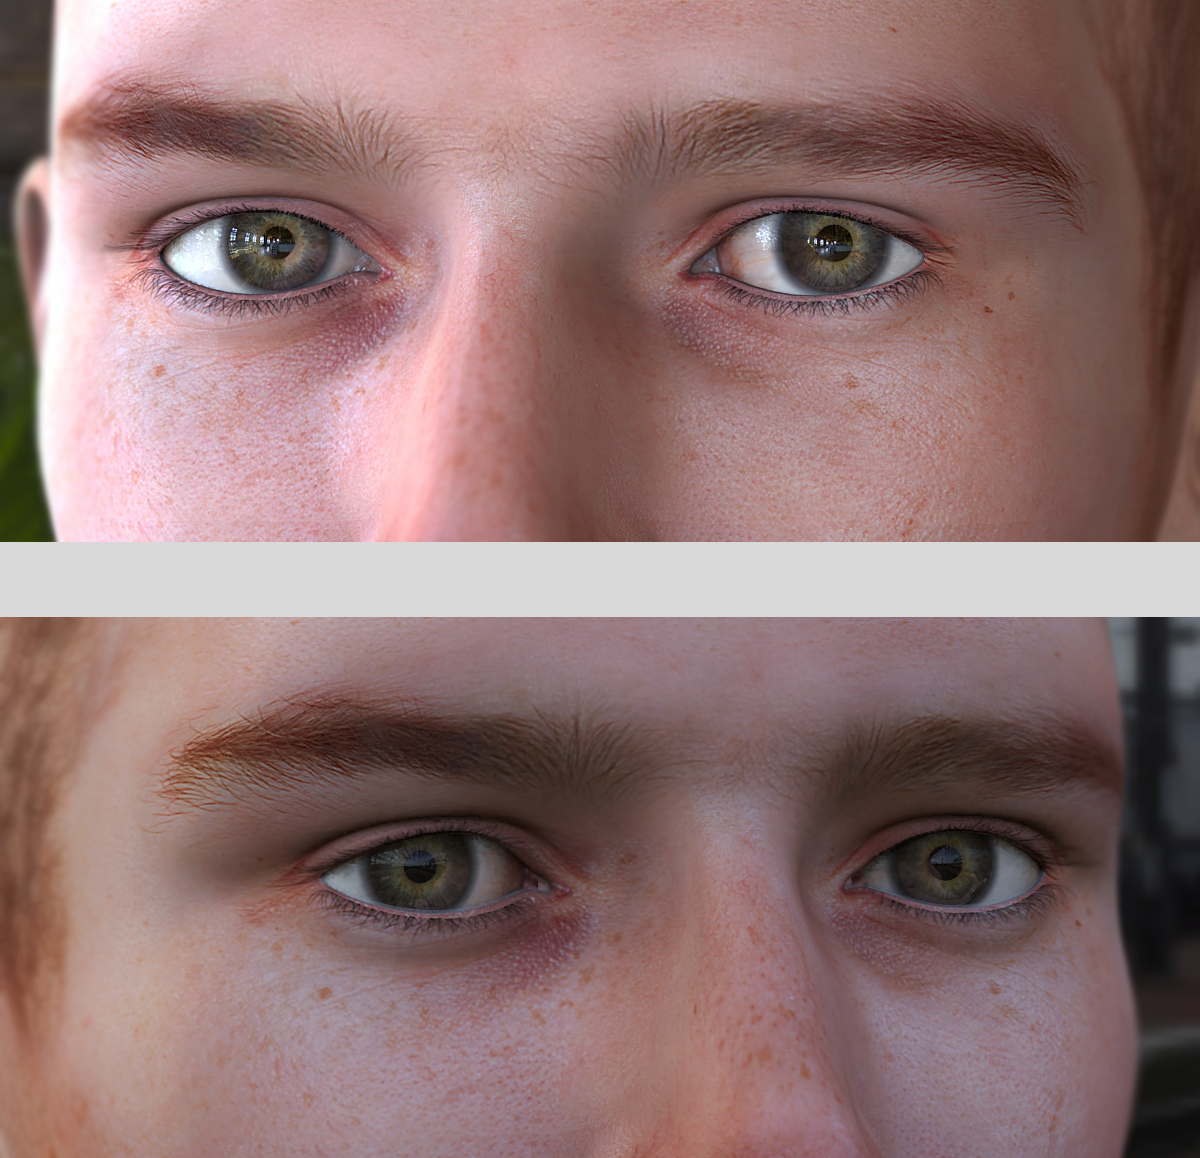
As 3D artists we all know that the eyes are the giveaway when it comes to attempting realism. Even for the major studios the challenge is the eyes. So in an attempt to make my characters eyes look a little less "painted on” I spent some time on a Google “eye macro” image search studying those crazy gobs of goo we spend our days looking through. I also spent a few hours in the Daz3D Galleries looking at some amazing renders. It turns out that DAZ characters do have the makings of great eye realism but strangely the default when loaded is not great natural eye geometry.
The eye surface has two distinctly different surfaces. The cornea and the sclera. Both are as reflective as the other but the cornea is smooth like a mirror and the sclera is quite bumpy. In addition, the cornea is like a bowl that sits on top of the sclera. This produces a different set of reflections than the sclera which is much less curved than the cornea (keep in mind that one thing that will give away the eyes is a long even reflection that crosses the over the sclera and cornea unchanged). There is also a fair amount of refraction introduced by the cornea. This magnified the iris and also causes some cool looking caustics when light hits the eye from the side.
Behind all of that is the iris. This is a crazy and fascinating structure like well chewed bubble gum stretched out; lacing the pupil to the center of the eye. The iris continues behind the sclera right where the cornea turns into the sclera.
The attached set of files is my attempt to mirror these aspects of the eye as closely as possible, Included in the ZIP files (4 in total at the bottom) are 3 morphs for each eye:
CorneaModLeft and CorneaModRight
IrisModLeft and IrisModRight
IrisModLeftNoRing and IrisModRightNoRing
CorneaMod reshapes the cornea to match that of a somewhat near sighted eye. The over exaggeration helps with the appearance of realism. This morph also pulls the eye surface mesh into the middle of the head so that it’s out of the way altogether. It’s not needed when using reflections and it’s one less transparent surface that has to be calculated.
IrisMod completely flattens the surface of the iris. The outer edge of the iris is also extended and curved below the sclera. The default iris is quite large so I have set the EyeIrisSize morph (Morphs++) to -0.30 for my renders.
IrisModLeft(Right)NoRing stretched the iris mesh outward so that the outer edge of the image map is pulled out of view. This allows us to control the dark ring where the iris and the sclera meet.
These files are in a Runtime folder which needs to be added to your runtime. There is an inject and remove file to apply and remove the morphs.
In addition to these morphs there are 3 shader files.
EC_Cornea
EC_Iris
EC_Sclera
EC_Cornea is purely a procedural shader and sets the surface reflective properties of the mesh as well as the refraction that magnified the iris.
EC_Iris shader includes a started texture map but the PA’s make much better textures than I do and almost all iris textures will work with this kit. To load your own click on the color node and simply load the map you want to use. The bump map is divided between a normal map and a texture map. The texture map should be the one that comes with the color image that you loaded. The normal map is internal and helps produce the caustics when the eye is lit room the side. You can set the normal map to zero if you are lighting from the front since it will darken those areas. This shader should also be applied to the pupil.
EC_Sclera shader includes a starter texture map but once again you can load any that you like. There is also an internal alpha map which fades the inner edge of the sclera into the iris texture map behind. The bump map is internal and creates the bumpy surface of the sclera. Finally, the reflection node sets up the surface reflection. Keeping this at the same value as the cornea reflection seems to work the best. You will probably have to adjust both reflection settings to suite the lighting in your scene.
These mods are far from perfect. I am working on tear morphs that make the tear concave as opposed to round since this is how the tear forms in a real eye. I am also working on a lacrimal morph that stretches the lacrimal over the outer edge of the sclera and then adds an alpha transparency to get rid of the sharp edge between the two. Unfortunately I haven’t been able to get studio to import those so no pz delta files for those yet but I will update this post soon with an updated version that includes them.
One issue I know of is the right pupil is a little smaller than the left. to fix this i set the EyePupilDialate to 0.08. My update will fix this.
In the mean time treat this as a beta and feel free to leave suggestions and any issues you may run across.
All the files can be found below in 4 seperate zip files. For those curious, all renders were rendered with the Carrara photrealistic renderer using HDRI.
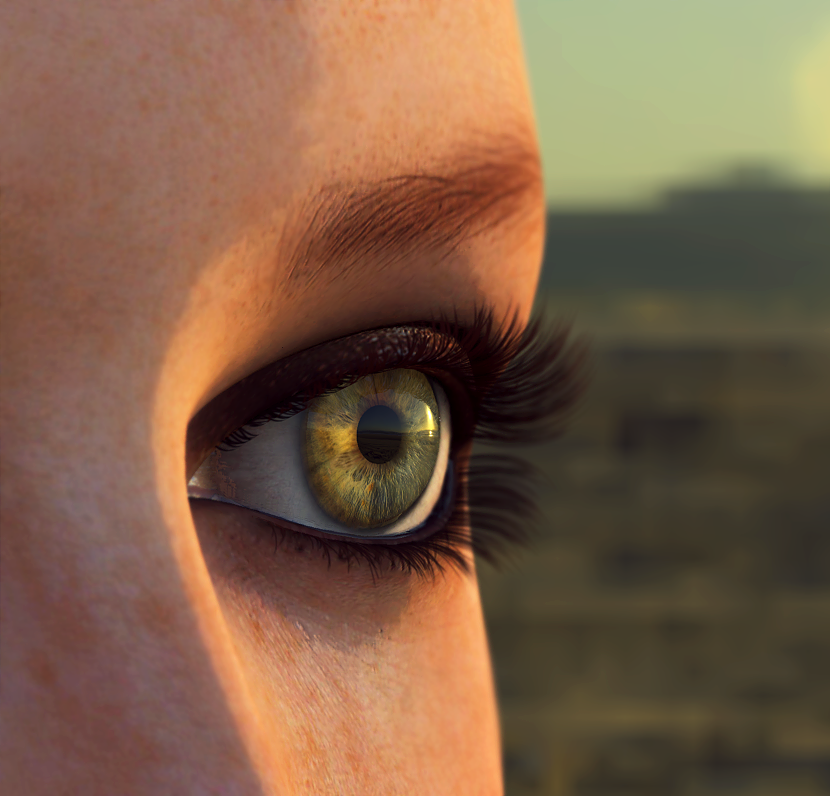
Side view showing more of a realistic cornea bulge:


Daz 3D is part of 
Connect
DAZ Productions, Inc.
224 S 200 W, Suite #250
Salt Lake City, UT 84101
Licensing Agreement | Terms of Service | Privacy Policy | EULA
© 2024 Daz Productions Inc. All Rights Reserved.
Comments
I know I can look in the zip but which figure are they for?
when you post it
the3Digit, check in a few minutes. I may need to split the zip into multiple files. It's for V4. I'll add that to the title. Thanks.
wow ow owwo wow!
thanks :)_
Thank you very much from a mutual eye-realism lover... they are the windows of the soul, even if the rest of the body might be fantasy based!
 Silene
Thank you for the information and the files. Very informative and very generous.
TY
will try and look but as a person who drags corneas into heads to speed up renders without transparency cannot promise
I will try with Octane for closeups
This is nuts! Above and beyond.
Thanks!
Wendy, thank you for the tip of the day! I will try to move cornea into the head.
These eyes are splendid, thank you Man!
Thanks everyone!
I want to add a note regarding the iris shader. That should also be used for the pupil shader.
Also, I have been playing around with this kit on M4 and it's 100% compatible.
8really really cool, thanks stringtheory
man, I love such photorealism!
Sweet Suite!!!
Bravo, stringtheory9!!! Love ya man!!!
Thanks!
In this preview, I love how the refraction of the cornea is filling up with the colors of the iris (instead of just seeing through the part which would otherwise appear to be clear).
I'm really looking forward to see how well I can achieve my ever-so-sought-after (by me, at least) "Iris Gleam", which causes the opposite side of the iris to 'glow' from the side of the face which is lit - so if the bright highlight of the face is on the ring, the left side of the iris is what glows.
It can be common to get eyes to stand out by using an iris texture in the glow channel, which can be fine for stills. We'd just blacken out the texture on the appropriate side to create the appropriate gleam.
I started really getting into this watching the Clone Wars, as the seasons progressed and the team got better at their techniques, it becomes obvious that Iris Gleam was also part of the direction - and it really adds to animations of eyes, especially for emotions.
To do this, I've been trying highly concave irides - that I've been able to better achieve using Arki's awesome EYEDeas figures. But I have a feeling that a flat set of irides might just work beautifully.
My challenge was to keep away from the glow channel, and have the scene lighting create the glow and interact with the cornea/iris relation, so I began by using the highlight channel in combination with adjusting the highlight size onto the Iris using the shininess channel interactively. It's been hard to show in my still examples, but really works great so far. I love the V4 and M4 versions as they just conform to the figures. Genesis (1 and 2) has been more of a challenge, using parented eyes - but I still like the EYEDeas better that the original mesh.
But I bought Arki's after my first, very fast, down and dirty test of creating a simple morph on the irides, and it worked!
So I am really looking forward to trying this. Also, the version of EYEDeas 3+ I'm using on M4 and V4 use the same texture maps as those used by M4 and V4, so the shaders from this kit will be a fun experiment on those! Still, the version used on Genesis (just to try something different - try Arki's amazing art) are mapped specially by Arki and use her custom maps - I could still try these shaders and switch out the texture maps - perhaps try to make some custom Normal maps? We'll see ;)
Either way... I'm really excited about this!
So if anyone want's to use these shaders on Genesis (or actually any model that needs eyes), just use Arki's EYEDeas 3+ individual eyes which use the M4/V4 eye maps! ;)
...and no... Arki doesn't pay me to promote her eye figures! I just really Really REALLY like them!
=====================================
Wendy and Vyusur, why drag the cornea into the head? That's nuts! You mean, just use the glossiness imaged into texture maps instead of using a clear layer?
Thanks Dart!
That cornea refraction is what got me going on this. Since my focus is on cinematic type conversation shots a lot of close up character framing will be somewhat side on. EYEDeas3+ is a great product. Hopefully this kit added to that will produce some awesome outcomes!
Very cool! Hopefully I'll get some time to play today.
brilliant thread!, big thank-you @stringtheory9!
I'm also sold (by Dart...) on the EYEDeas3+ package, be sure and pick up the free related shaders:
https://www.daz3d.com/advanced-shaders-for-eyedeas-3
they look poser-centric, but the price is right, and someone may have had some luck with Carrara/DS.
cheers,
--ms
Just a big thank you for providing this fun resource AND the much needed Explanation! I may be late to this party but I'm still grateful.
Whoa, how in the world did I miss this awesome thread up til now? Thank you Stringtheory, this is incredible info!
I know, right? When it comes to this forum, it's amazing how even just a short time away can screw with a person's knowledge base!
I must have missed this first time around too!
The cornea shader references a texture named V4ScleraSpec.png. Of course all the textures that come with V4 are in jpg format, and none is specifically named V4ScleraSpec, so I'm assuming this is something Stringtheory created, but it's used in the shader as the texture for the reflection channel, so I'm not sure what to substitute. I want to get those great reflections but not sure what to set it at, anyone got any suggestions? I can see the reflection channel for the sclera is set to a percentage (14.13% to be precise) and maybe I should just use that as my guide instead.
Thanks @Jonstark and everyone,
The V4ScleraSpec.png was a not so successful attempt to create a gradual blend between the clean reflections of cornea and the bumpier reflections of the sclera. No matter what I tried I couldn't completely eliminate the harsh transition that can be seen when the reflection spans the cornea and the sclera. I must have left that map set to external (Oops). Setting the value to a percentage works just as well but I'm attaching the file for any minuscule difference it might make.
Thanks! ;)
Fantastic looking eyes ST!!! Fantastic!
Thanks Dartanbeck!
Also, I mentioned some additonal morphs for the tears and lacrimal in the first post but I abandoned those becuase I never got them to work better than the default geometry.
Thank you so much for this Stringtheory, it just looks fantastic. I just went with the same percentage reflection you had on the sclera (14.13%) and it looks pretty great to me.
And thanks too to Dart for turning me onto the Eyedeas eyes. I picked that product up since I'm mostly moved to using Genesis1 (though I still love and use M4/V4 too), and Genesis1 only has one slight morph to control cornea bulge, nothing else, which is really very limiting. So I hand-jiggled to put the Eyedeas eyes in approximately the right place parented to the Gen1 eyes, and made the original Genesis1 eyes invisible, then added Stringtheory's textures, looks pretty fantastic to me, very happy with this. Now what to do about those dang lacrimal textures, and onwards towards decoding how to make decent looking teeth...
Looks great Jonstark, that iris color is really cool!
Man I can't stop looking at those eyes in all the renders in this thread, they really are stunning and add a TON of realism to the render. The eyes truly are the windows to the soul.
For anyone curious, the Eyedeas product has a ton of morphs built in, you can really change a lot about the shape of the iris, whether it's open/shut, the shape of the cornea, etc. I'm just barely getting to know it, but so far it looks like a really good product.
Btw your skin textures look amazing too Stringtheory. The M4 renders look like Edinburgh from Danae, available over at Rendo, but that's just a guess. Was hoping you would put up an entry in the challenge this month, if only so I could get a peek at your process to get such good skin
Edinburgh it is! The V4 texture is Tiffany (MRL). I didn't really do anything special on the skin textures. I think the credit goes to the texture artists and to some free HDRI maps I downloaded (and of course the Carrara render engine). For the very top image I used Abandoned.hdr and the rest foyer.hdr from this free collection: https://gumroad.com/l/hdris2?_ga=2.114207815.1502539852.1510122622-849884022.1462692821 These were the only light sources in the scenes.
Under GI you'll need to turn the lighting quality up to best and the accuracy to 4 or you'll get some really bad artifacts. For Abandoned.hdr I cranked the GI Intensity up to 400. I also used a specular map for the shininess but if I remember correctly it didn't really change the render very much. I also did a dab of color balancing and level adjustements in Photoshop.
Here are the settings I used: